Showing posts with label Arts and Crafts. Show all posts

Tuesday, June 4, 2013

Fun & Frugal Summer Activities for Kids #2 Popsicle Stick Bird Feeder


Ok ladies and gentlemen, since we already have our popsicle sticks out from yesterday's activity, lets try another.  

We love birds!  Every spring for the last several years the Lord has blessed us with birds that nest on our front porch in a wreath.  Usually, we have house sparrows visit us, this year we have robins.  The babies just flew the coop last week. 

Beings that we like birds so much, we like to have a bird friendly yard with things that make them feel invited. Which brings me to our next project... Popsicle Stick Bird Feeders.


Picture Source

The Stuff You Need:
50 popsicle sticks
1 large popsicle stick (the kind the doctors use)
1 bag of bird seed
1 tub of outdoor paint
2 long pieces of hemp cord to hang their bird feeder
Glue - Tacky or Elmers
Glue Gun & Sticks
 
If you want to get all fancy, and of course I know you do. You might also want:
Glitter glue sticks 
Puffy Paint (y'all remember that stuff?)
Gems 


Directions:
  1. Line up 12 popsicle sticks.  Glue 2 sticks across them.  Turn it over.
  2. Do a second row of popsicle sticks going in the opposite direction to strengthen the base (I actually did this at the end because it was a last minute decision, but doing it at the beginning will give it more support as you build).
  3. Alternate popsicle sticks around the frame once.
  4. Glue down to the large popsicle stick.
  5. Continue alternating popsicle sticks around the outside until you have 6 rows, gluing each popsicle stick down as you go.  Set aside to dry.
  6. Let the kids paint their bird feeder, and set aside to dry.
  7. Parents: using a hot glue gun, attach the hemp cord to the underside of the bird feeder.
  8. Thread the cord underneath the top round of popsicle sticks (as shown above) and again, glue using a hot glue gun.
  9. After everything is dry, find a safe place outside to hang and fill with bird seed.  
To go along with these bird houses, you could even study some birds.  One of our favorite bird books for kids is Birds, Nests & Eggs (Take Along Guides) by Mel Boring. My oldest is our bird fact girl, I attribute that to this little book.

Another goodie is Bird Log Kids: A Kid's Journal to Record Their Birding Experiences by Deanna Brandt.  This little gem is a great way to encourage kids to learn about, and journal the birds that they see.  You could even continue this through the summer.


Monday, February 11, 2013

12 Easy Valentine Crafts & Snacks for Kids


Valentine's craft...

This heart wreath is cute and simple, simple!  You could use construction paper or scrapbook paper, the latter being the cutest of course!!  We are making these for our front windows.


Lollipop Flowers
 
My girls would love to wake up with these lollipop cuties on their dressers on Valentines Day!  What a sweet idea (pun intended)! 


popcorn-valentine-hearts

Popcorn Valentine Hearts!  If you stuck these in a little cello baggie with a red ribbon they would make adorable valentines for kids to give their friends!  These are definitely on our list for next week.


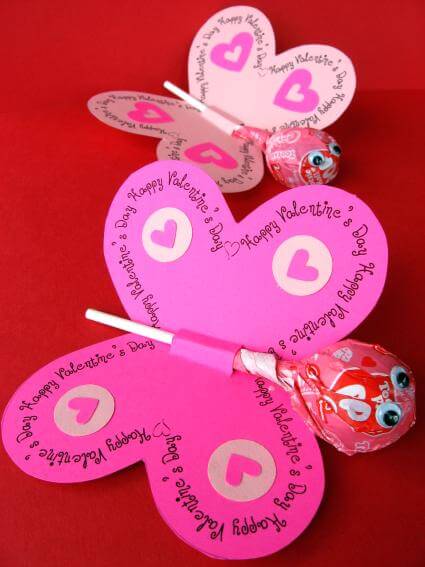
The Lil' Chef is going to make these butterfly lollipops with the little kids that she helps with during my Bible study.  They are 2 year olds, so she is going to have them already cut out for the kids to decorate. 

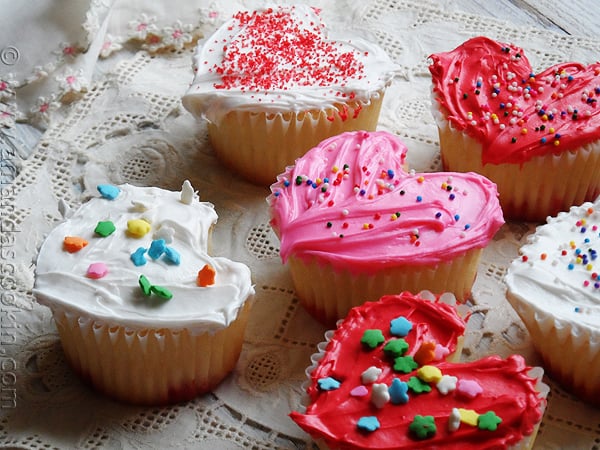
Easy Heart Shaped Valentine Cupcakes from AmandasCookin.com
 
Heart Shaped Valentine cupcakes!  Need I say more {smile}.


Cute Valentine Craft
My little men would LOVE these airplane candies!
 
boy-valentines
 
Its a bird, its a plane, no its Valentine Man! How stinkin' cute is this!!
 
 
Marshmallow Love Bugs | Valentine's Day Recipes - Parenting.com
 
I think these love bugs are my favorite! 
 
 
valentine craft
 
For the kid that loves dot painters!  How creative!
 
This is also another valentine craft we are doing today.  I cut out white hearts on the cricut and use a white crayon to write a message on each one (if its kid-specific, I'll put their name on back in pen).  When they get home from school, they will go on a scavenger hunt to find the hearts and pull out the paints to reveal thier message. Fun!
 
These are really cool!  I think I am going to have the kids make these secret message valentines for each other, but the recipient will have to paint their hearts to reveal their message!
 
Valentine hot dog by Spoonful
 
I think we will be having these heart hot dogs for lunch on Valentines Day!
 
Valentine Crafts and Recipes 15
 
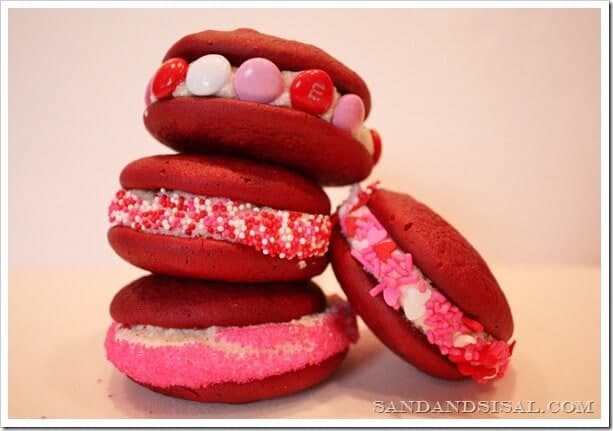
And these Red Velvet Valentine Whoppie Pies for dessert!  The Lil' Chef got a whoopie pie maker for her birthday.  I think will be a lot of fun to make and decorate.
 
Do you have any fun Valentine crafts and goodies planned? 

Friday, March 30, 2012

Resurrection Day Craft Ideas

Being a Christian kinda makes Resurrection Day pretty special to me.  It was the day that, many years ago, my Lord and Savior willfully died and shed His precious atoning blood for me. 

Romans 5:8 - But God commendeth his love toward us, in that, while we were yet sinners, Christ died for us.

We do not celebrate Resurrection Day with bunnies and eggs but with the focus being the death and resurrection of our Lord.  So, I wanted to search out some resurrection related crafts that did not include the eggs and bunnies.  Here is what I found...

I thought this "stained glass" cross was pretty cool and seemed to have pretty easy directions.  I think this is one we are definitely going to make next week.

I am thinking if you have been on Pinterest at all in the last month or two, then you have seen "The Tombs Been Rolled Away" centerpiece.  I searched and searched to find the directions for this one but just kept getting ads.  I think this one is fairly obvious even with out directions.  I have seen the "tomb" made from a plastic cup as well as a small clay pot.  They say to start your grass early,  I REALLY want to do this one, so I'd better get started.

These are not your average crescent rolls, no sir-ree!  They are Resurrection Rolls and they are pretty nifty.  I am definitely making these with my kids!  Basically you wrap a large marshmallow inside and it disappears (melts) while it is baking.  The post that I linked to has the best directions that I have found for these and she gives scripture suggestions to read the week before making them as well as  during pre-heating time. 

If there is a roll, then there must be a cookie, right?  I also came across Resurrection Cookies, which are also very cool but a little more involved.  These guys sit in the oven overnight which of course represents it Jesus being in the tomb.
This Cross craft is so simple and yet it is one of my favorites.  I especially like the one with the blue and green background.  Pretty, don't you think?

I think my boys would really enjoy this empty tomb paper craft.  It seems simple enough for the younger crowd. 

Matthew 28:6 - He is not here: for he is risen, as he said. Come, see the place where the Lord lay.

Hope you have a Happy Resurrection Day!!

Friday, October 7, 2011

Links I Love...Fall Decor

If you have not been on Pinterest yet, may I ask what in the world you are waiting for??  I am not on there all the time but always find amazing stuff when I am.

Today I have been on the couch way more hours than I care to count.  Not because I am being lazy but I am sick and feel miserable.  So while my kids entertain themselves and pull out almost every toy we own in the process, I decided to do some mindless searching on the internet. 

I am helping to decorate for our homeschool support group's Fall Dinner this week.  I had a few ideas but decided to check out Pinterest for some more.  Here are some of my favorite fall decor links that I found. 


Like this gorgeous pumpkin topiary!!  I LOVE LOVE LOVE it!!!  Yvonne at Stone Gable has a simple tutorial to make them.  She actually has lots of great ideas and the RECIPES, oh how they make my mouth water. 


I have done cranberries & water in mason jars before for the Fall/Winter season but I really like the added greenery. Simple yet very elegant.

This is too Cuuute!  You can find them on Etsy bit I think I am going to make some of my own for the Fall Dinner.  I think these would make a great center piece.

I found this over at The Heart of a Home.  Let me just say that whoever this center piece really belongs to should count themselves lucky that I don't know where they live.  I would be the lady knockin' on the door saying, "Hi, excuse me, can I buy that!" (people in real life will get this)

I haven't pulled out my fall decor yet, I am still trying to get thru switching clothes.  But I have found lots of great ideas for when I do!

Thursday, August 11, 2011

Homemade Playdoh

A friend of mine from church recently made some homemade playdoh for Little Bit's Sunday school class. 

Yep, all homemade.  The last color was red and then it got mixed with another color.  I could hardly take pictures before they were all over this stuff!
I thought it was a neat idea.  I had heard about making playdoh, just never attempted it myself.  I guess I thought that it wouldn't be the same, that it wouldn't be like real playdoh.  Yes, it is a little different but still quite worthy in my opinion. 

I was hanging out with Little Bits this morning in his Sunday school class and this gave us a chance to play with the playdoh.  This reminded me that I wanted to try my friends playdoh recipe. 

I can't believe that I have 4 kids and I am just now getting around to making my own playdoh.  Shame, shame.  I also can't believe how simple it was.  Here is the recipe:

1 cup flour
1 cup water
1/4 cup salt
2 tsp cream of tartar
1 tbsp vegetable oil
Food Coloring - adjust according to shade you are trying to achieve

Yes, I dirtied a few pots but it was well worth the effort.  In the larger pot I doubled the recipe and added yellow food coloring.  Once it was all mixed up I pulled half of it out and ten added red to make orange.
Place all ingredients in a medium sized pot. Cook over moderate heat, stirring constantly.  Dough eventually becomes harder to stir and will gather on spoon. At this point dump the dough onto wax paper, allow to cool somewhat, and knead it until it is smooth. Store in plastic bag or container.

We just added color until we had a shade we liked.

Here computer girl is helping with the stirring.  This is a great recipe for the kids to help out with.

Isn't this just a beautiful picture!!
Just a side note, do not omit the cream of tarter, it keeps the playdoh fresh for about 6 months.

Enjoy!

Wednesday, March 23, 2011

TOS Crew: Artistic Pursuits

We love anything artsy.  My kids love to draw, color, paint, and all the other fun and messy things that art can be.  This year I have kind of slacked a bit with a true art curriculum, the kids do so much coloring, cutting and drawing on their own that I haven't really worried about it.

Photobucket
Once we were given the opportunity to review Stories of Artists and Their Art, by Artistic Pursuits, I realized how much we had been missing!

I really like Artistic Pursuits and the way it is laid out, the lessons are a mixture of art history as well as an art lesson.  Each lesson starts out with a factual story about an artist or a particular piece of art (think Mona Lisa).  Next the student gets an lesson on a project similar to the the one they just learned about. 

Here is an example, after learning about Michelangelo the students are taught how to do a Carving of their very own, OUT OF APPLES!!  The girls are doing this project, but we aren't quite finished yet (the apples take a while to dry out).  I would love to post a picture of the process that they are making but I am having computer issues again, so I will have to post the pics later.  Sorry. 

We also learned about the artist Cimabue, and then we painted just him, with water colors.  Again, I would love to post the pics but, I have issues.  Computer issues that is : )

The kids really enjoyed learning about the different artists, as well as their famous paintings.  I think even more than reading about these masterpieces, they really enjoyed trying to recreate them.

 Photobucket

Artistic Pursuits offers 10 different books that take students from Pre K to 12 graduation.   We reviewed Artistic Pursuits - Stories of Artists and Their Art, grades K-3 Book 2, which has 32 Lessons/ Projects which would take you through the whole school year if you did one lesson per week.  

The materials that are introcuded in Book 2 are:
  • Pan Watercolors
  • Tempera Paints
  • Oil Pastels
  • Printmaking
  • Stamping
  • Papier-Mache
  • Mixed Media


  The Artists/ Masterpieces that are studied in Book 2 are:

1. Cimabue
2. Madonna Enthroned, with Saints and Angels
3. Giotto
4. Lamentation of Christ
5. Limbourg
6. August (Departure for the Falcon Hunt)
7. Van Eyck
8. Jean Arnolfini and His Wife
9. Leonardo da Vinci
10. Mona Lisa
11. Michelangelo
12. Delphic Sibyl
13. Raphael
14. Portrait of a Young Woman
15. Anguissola
16. Three Sisters Playing Chess
17. Durer
18. Flight to Egypt
19. Bruegel
20. Hunters in the Snow
21. Parmigianino
22. The Conversion of Paul
23. Rembrandt
24. Abraham's Sacrifice
25. Vermeer
26. The Artist in His Studio
27. Fragonard
28. A Young Girl Reading
29. Turner
30. The Fighting Temeraire
31. Millet
32. The Gleaners


The Artistic Pursuits books cost $42.95.  They are non-consumable, meaning once you buy them you can use them over and over again.  Many of the books can be used for multigrades, like the book we got is for K-3, but my 4 year old, 2nd and 4th graders can all use it. 

I would recommend this art curriculum.  It is much more thorough and far beyond the standard arts and crafts taht we are used to.  Children get to learn art history and how to do art like the pros! 

If you are interested, you can purchase your own Artistic Pursuits book directly from Artistic Pursuits

Please take a moment and check out what others on the TOS Crew are saying about Artistic Pursuits.

We recieved Artistic Pursuits free of charge for review purposes.  The opinions expressed here are my own and I was not influenced by the company or the free product.

Saturday, July 31, 2010

Saturday Solutions: Mason Jars

My plan was to tell you all about some of ways that I use mason jars around here, with lots and lots of pictures.  BUT, since I live with four young people my camera isn't always in good working order. 

Accidents happen, like last night when SOMEONE dropped my camera on the ground and BROKE it!!!  I am not naming names nor am I upset about this, cause accidents happen (sigh).  I am not even going to bother telling you all how I just can't seem to keep a camera in working order for any length of time (double sigh).  Do they make disposable digital cameras yet??  Any camera suggestions?  I am thinking, how can a person blog with out a camera?

Ok, now that I got that out of my system lets talk about mason jars.  I really do love them, what is there not to love right!!  Here are some of the ways that we use them round these parts, I may not live in the country but at least I can talk like I do.  LOL! 

Soap Dispensers - I recently turned my one and only blue mason jar into an adorable with hand soap dispenser, kinda like this one here... except I have a cute little raggedy piece of fabric tied around mine. 
It is sitting on my kitchen sink and it looks just adorable.

Food Storage - I love to store my oppy-meal (that is oatmeal for anyone that is 5 and under), popcorn kernels, brown rice, and pasta.  I also like to use it for my homemade colloidal silver and kombucha.

Craft Storage - Love to use them to hold, knitting needles, ribbon, beads, buttons, colored pencils and paint brushes.

Drinking Glasses - we have jelly jars, pint and quart sized jar that we drink from.  Actually, I talk a quart of water to bed with me every night, although I never quite finish it.  That might be a good thing otherwise I may not get much sleep. 

Lamp - Yes, I have a mason jar lamp that is filled with buttons.  It sits on my kitchen counter next to the one pile of junk that I allow myself to have.  I have strategically placed the lamp here in hopes that eyes will be drawn to the "cute and adorable lamp" and off of the junk pile.  See, I am one smart cookie! 
The lamp is just a quart sizes jar and a lamp attachment thingy that you can buy at Michaels, AC Moore or if you live out in the country I believe it is Hobby Lobby.  I tied a fat gingham ribbon around the top of the jar because it just needed somethin'.

Canning - Well, kinda.  I have only done this twice and it was appleauce.  I guess taht counts.  we go apple picking at this lovely orchard each fall and we always end up with way more apples then we could ever eat So we made applesauce, in a crockie pot and canned it.  It was yummy, I hope to do it again this year.

Candle Holders - You can stick a candle in the bottom tie some cute ribbon around your jar and call it a day OR you can take a quart sized jar and fill it with something (like right now I have sea shells and water, at Thanksgiving I do water and fresh cranberries or you can just use potpourri) then put a glass votive holder in the jar opening.  Now finish it off with a ribbon, raffita or berry ring around the jar.  These are great sitting on your kitchen counter, in a bathroom or sometimes I will line up three of them as a centerpiece.  Once you have the jars and votive holders you are all set for any occasion.

Really wish I had a camera to show you all a picture of these.  I will have to post a picture once I get a new camera.

Flowers - I would love to tell ya that I fill my mason jars with all the beautiful flowers from the flower garden that I have out back but that just isn't so.  I have concluded that this is just not the season in my life for that to be.  I do however make sure that ours trees are trimmed well enough for me to enjoy all the flowers in my neighbors garden. 
I occasionally put flowers of the store bought variety in mason jars.  Flowers in a mason jar just shout Spring Time!  And you know when your adorable little ones bring you weeds "flowers" from the yard, Mason Jar! 

I have our house decorated our home in a Primitive Country kinda Style (or like Bob Evans as The Hubs says) so anywhere or anyhow I can fit mason jars in here suits me just fine, like I said I love them.

There are a few ideas taht I have found and would like to try with mason jars:

Sewing Kit - A Mason Jar Sewing Kit.  You might wanna check it out, it is made by Martha Stewart so you know it is cute.

Canning - I would love to get into this but I think you need to have a successfully growing garden.  Well, Lord willing there will be next year. 

Gifts - I have never made the Mixes in a Jar, I think I might put some of these together to give out for the holiday.  I also wanna make some Applesauce Cakes in a Jar because they just really sound neat.

Mason jars are so veritile, you can really use them for so many things.  How do you use your mason jars?

Tuesday, May 25, 2010

You Did What With Your Salad Spinner?!!

I am sure that is the question that you will be asking me in just a few moments.  I had seen it on several blogs and on a craft website somewhere.  I thought I would try it some day.  Well, some day was Friday and  the kids LOVED it!  What is IT you ask?  Salad Spinner Art of course. 

I remember when I was a kid having one of those spin art machines, which I loved BTW, but I guess in today's economy moms have been getting more creative.  The next best thing would be a salad spinner.  Here is what we did....

First you take a piece of card stock, your salad spinner and a pencil. 
Trace around the base of the inside piece or colander.  


Next, you are going to cut it out in a circle so that it will fit snugly in the bottom of the salad spinner. 
I did try to use a rectangular piece but it didn't work out so well. 


I did a trial run the night before I let the kids do it, and I found that if you are using acrylic craft paint it works best to water it down just a bit. 


You take drops of paint and go for it.

So that it looks kinda like this.

Or this.


Or maybe even like this one.

 
Then you spin, spin, spin!


I had the kids wait for it to stop spinning on it's own.


Last, check out you new creation! We are going to make a mobile out of ours for the playroom.


WARNING: Just to let you know, this can be a little messy.  Buts it's LOTS OF FUN!


For other great tutorials, check out Smockity Frock's Tutorial Tuesday.  While your there you can congratulate her on her adorable new baby girl!

Monday, April 26, 2010

Making Cards Again!

I used to be VERY into scrapbooking and card making, I even used to be a demo for Stampin' Up!  Somehow, I got away from this little passion of mine.  My sister has started going to these Friday night card classes and she had invited me a few times but I had thanked her and said naa.  This time when she told me she was going I think I might have invited myself to go : )  So glad I did, I had a great little time. 

We had so much fun that she even came over on Saturday and we made more cards while our kids ran wild played nicely together out back.

Here are the few things I accomplished:


Can't wait til the next one, doing this made me realize how much I missed it!  I am  going to be doing a scrapbooking class soon too.


LinkWithin

Related Posts Plugin for WordPress, Blogger...